 Learn how to fold gyoza perfectly every time with this easy step‑by‑step guide. Clear photos, simple pleats, and tips for making beautiful homemade dumplings.
Folding gyoza looks complicated at first, but once you learn the technique, it becomes fast, fun, and surprisingly relaxing.
I’ve folded hundreds of dumplings over the years, and this guide shows you exactly how to do it — step by step, with clear photos and a method that works every single time.
Making a classic pork and cabbage gyoza or experimenting with your own fillings? The technique of how to fold gyoza stays the same. With a little practice, your dumplings will look neat, tight, and ready for that perfect pan‑fried crisp.
In this guide, you’ll find everything you need: how to choose the right wrappers, how to fold gyoza with clean pleats, how to cook them for crisp bottoms and soft tops, how to store and freeze them, plus a full recipe for my go‑to pork and cabbage filling.
This is your complete, no‑nonsense guide to making gyoza at home.
Let’s fold.
What You Need to Fold Gyoza
- round gyoza wrappers (store‑bought or homemade)
- your filling of choice
- a small bowl of water
- a clean tray dusted with flour
Step-by-Step: How to Fold Gyoza
Step 1 — Add the Filling
Place a gyoza wrapper in the palm of your hand and spoon about one teaspoon of filling into the center. The amount matters: too little and your dumpling will look flat; too much and it becomes impossible to seal. Aim for a small, compact mound that leaves at least 1.5 cm of clean wrapper around the edges. This space is what allows you to pleat neatly later on.
Step 2 — Wet the Edge
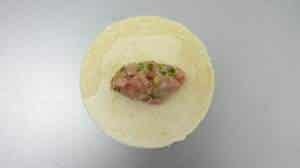 Dip your finger into a small bowl of water and lightly wet the top half of the wrapper’s edge. You don’t need much — just a thin, even line.
The goal is to make the dough tacky, not soggy. If the wrapper becomes too wet, it will slide around and refuse to hold a pleat. A light touch gives you the perfect seal.
Step 3 — Make the First Seal
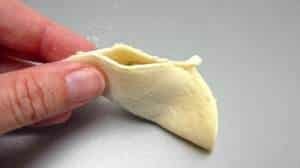 Fold the wrapper in half like a half‑moon, bringing the top edge toward the bottom edge. Pinch the wrapper together only at the center to create your anchor point.
This tiny pinch is the foundation of the entire dumpling: it keeps the filling in place and ensures your pleats stay symmetrical on both sides.
Step 4 — Start Pleating One Side
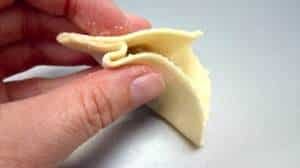 Starting from the center and moving toward the left, fold a small pleat on the front side of the wrapper and press it firmly into the back layer.Each pleat should be about 5–7 mm wide — small enough to look delicate, but large enough to hold shape.
Make 2–3 pleats, pressing each one down to remove any gaps. This creates that classic curved gyoza shape.
Step 5 — Pleat the Other Side
Return to the center and repeat the same pleating motion toward the right. Again, pleat only the front layer while keeping the back layer smooth. This gives the dumpling its signature look: pleats on one side, a clean curve on the other.
Press each pleat firmly to secure it. By the time you reach the end, the dumpling should feel tight and well‑sealed.
Step 6 — Press Out the Air
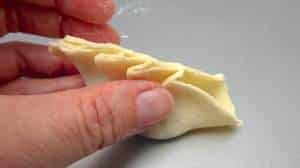 Before sealing the final pleat, gently press the filling with your fingers to push out any trapped air. Air pockets expand during cooking and can cause the dumpling to burst or leak.
A quick, gentle squeeze ensures the filling is compact and the wrapper sits snugly around it.
Step 7 — Shape and Set Aside
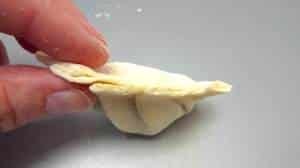 Once all pleats are sealed, give the entire edge one final press to reinforce the seal. Then place the finished gyoza on a floured tray or parchment-lined board. If you want that perfect restaurant-style curve, gently bend the dumpling into a slight crescent shape.
Continue folding the rest, keeping them spaced apart so they don’t stick together.
Homemade vs Store‑Bought Wrappers
You can absolutely make your own gyoza dough with flour and water, but store‑bought wrappers are reliable, thin, and perfect for beginners. If you roll your own dough, aim for a thin, flexible sheet — too thick and the cooked gyoza will taste chewy.
If you want a deeper look at what gyoza wrappers are and how they’re traditionally used, this guide explains the basics clearly and simply.
What’s Next? Cook Your Gyoza
Now you know how to fold gyoza, your gyoza are ready to pan‑fry, steam, or boil.
In the full recipe below, you’ll find my go‑to pork and cabbage filling plus the classic pan‑fry‑steam‑fry method for crisp bottoms and soft tops.
Enjoy!
Pork & Cabbage Gyoza Recipe
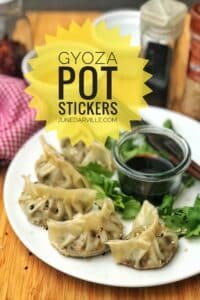
Learn how to fold gyoza perfectly every time with this easy step‑by‑step guide. Clear photos, simple pleats, and tips for making beautiful homemade dumplings.
- 20 gyoza wrappers
- 8,5 oz pork mince (250 g)
- 1 cup finely chopped cabbage (90 g)
- 2 tbsp soy sauce
- 1 tbsp grated ginger
- 1 tbsp chopped spring onion
- 1 tbsp sesame oil
- 1 tsp garlic powder
- salt
- white pepper
1) Add the pork mince, cabbage, soy sauce, ginger, spring onion, sesame oil, garlic powder, salt, and pepper to a mixing bowl.
2) Stir or knead until the mixture becomes sticky and cohesive.
3) Cover and chill for 15 minutes.
4) Place 1 teaspoon of filling in the center of each wrapper.
5) Fold and pleat the gyoza using the technique above.
6) Heat 2 tbsp oil in a non‑stick pan over medium‑high heat.
7) Add the gyoza and fry for 1 minute until the bottoms turn golden.
8) Pour in ½ cup water, cover, and steam for 3–4 minutes.
9) Remove the lid and let the water evaporate.
10) Fry again for 1–2 minutes until crisp.
11) Serve with soy sauce, rice vinegar, and a few drops of sesame oil.
Variations You Can Try
Even though pork and cabbage is the classic Japanese filling, you can switch things up depending on what you have in your fridge.
Chicken & Ginger
Use ground chicken instead of pork and add extra ginger for freshness.
Shrimp & Garlic Chive
Chop raw shrimp finely and mix with garlic chives or spring onion.
Vegetarian Mushroom
Finely chop mushrooms, cabbage, and tofu for a juicy plant‑based filling.
The folding technique stays exactly the same for all variations.
Best Dipping Sauce for Gyoza
A classic Japanese dipping sauce is simple and perfectly balanced:
- 2 tbsp soy sauce
- 1 tbsp rice vinegar
- a few drops sesame oil
Optional add‑ins: chili oil, grated ginger, or a pinch of sugar.
How to Cook Gyoza (Pan-Fry Method)
This is the method that gives you crispy bottoms and soft tops — the signature gyoza texture.
1. Heat 2 tbsp oil in a non‑stick pan over medium‑high heat.
2. Add the gyoza in a single layer, flat side down.
3. Fry for 1 minute until the bottoms turn golden.
4. Pour in ½ cup water and immediately cover with a lid.
5. Steam for 3–4 minutes.
6. Remove the lid and let the water evaporate.
7. Fry again for 1–2 minutes until the bottoms crisp up.
Serve immediately.
Storage & Freezing
Uncooked gyoza
Freeze on a tray until solid, then transfer to bags. Keeps 3 months.
Cooked gyoza
Refrigerate for 2–3 days.
Reheat
Pan‑fry to bring back the crisp bottom — microwaving makes them soft.
Frequently Asked Questions
Why do my gyoza fall apart?
Usually because the wrapper edges weren’t sealed tightly enough or the filling had too much moisture. Press out air pockets before sealing.
Can I make gyoza ahead of time?
Yes — fold them, freeze them raw, and cook straight from frozen.
Why are my gyoza chewy?
The wrapper was too thick or steamed too long. Store‑bought wrappers give the best texture.
Can I use wonton wrappers instead?
You can, but they’re thinner and square. They work in a pinch, but the texture is different.
What’s the difference between gyoza and potstickers?
Gyoza are the Japanese version — thinner wrappers, finer filling, and more delicate pleats. Potstickers are the Chinese style, usually larger with thicker dough.
What to Serve with Gyoza
- my Japanese spinach salad
- miso soup
- fried rice
- stir‑fried greens
- cold sesame noodles
Gyoza also make a great appetizer before ramen or donburi.